Guidelines
Using Elementor
Learn small things first and expand later — Everything is similar
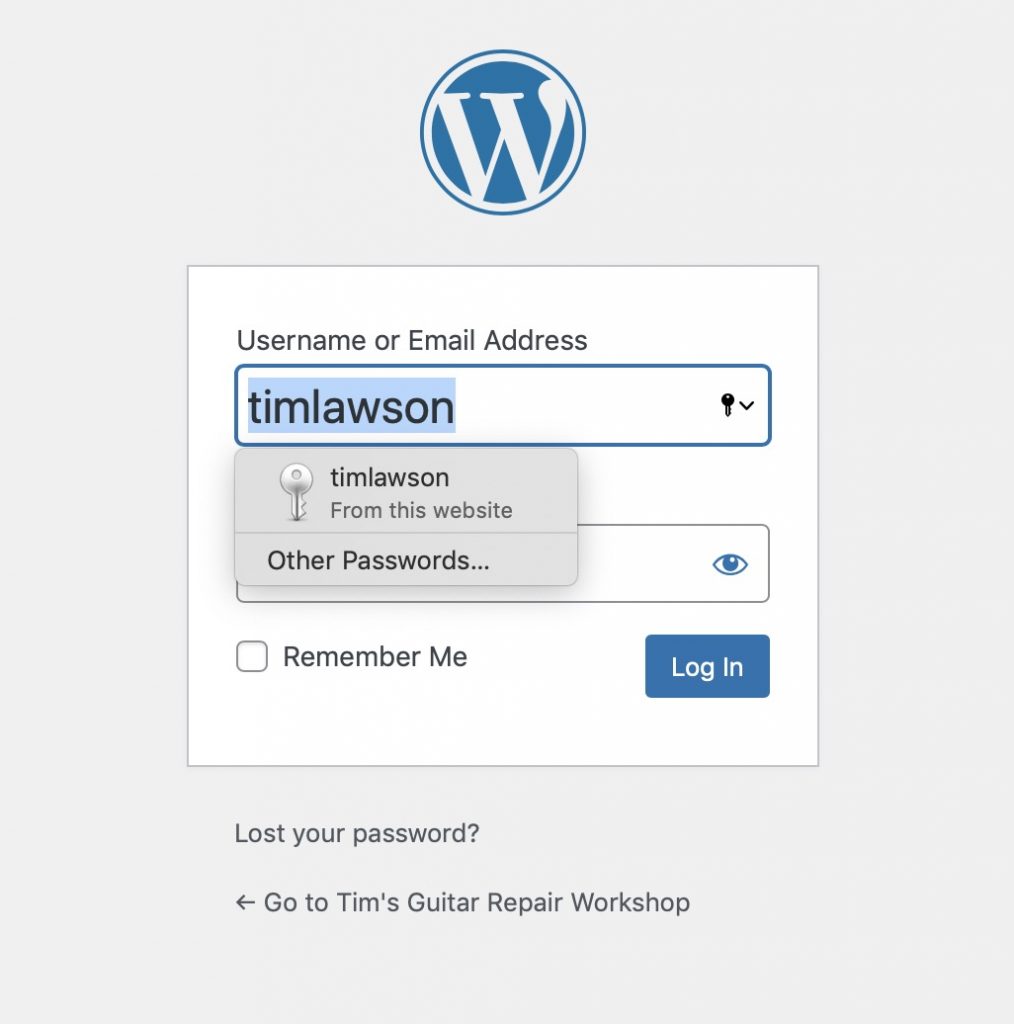
To gain access to the editing features of WordPress, you must be logged in. [Advanced: there are several levels of users for WordPress, each can have their own level of access to editing features. Admins have full access.]
Log in is always from https://timsguitar.com/wordpress/wp-login.php (if you’re already logged in, don’t click this link! You don’t need to).
(This will change once the site goes live and will be shortened to https://timsguitar.com/wp-login.php)
Once you complete log-in, you will automatically be redirected to the Dashboard. There is some general information provided on the dashboard page, as well as a menu in the left column of all the admin categories available.
Along the top of the page is another menu. At the left most edge is the WordPress menu. You can find help documentation there as well as a link to support forums and you can provide feedback if you like. It’s always there. Subsequent menu items will change depending where you go within your site. If you’re on a regular page, the next menu will look something like a MIDI plug. It will contain menu items to navigate back to the dashboard, edit your Theme and your Menus.
The next menu is your “site menu”. What’s on the menu will depend on the complexity of your site. Right now, there is Visit Site and Visit Store.
The Customize menu allows you to “tweak” settings concerning the appearance of your site. You should not have to go into this section — your site is already set up.
If you have Plugins or Themes that need updating, the next menu item that will appear is a double arrow icon with a number (specifying how many updates are available). You can click this item to shortcut to the Updates page. For now, *do NOT update* the Hello Theme.

The next menu item that appears is a “quote bubble” with a number. This will be how many new comments were left on your site from visitors. This feature is currently turned off.
Menu items you will use!
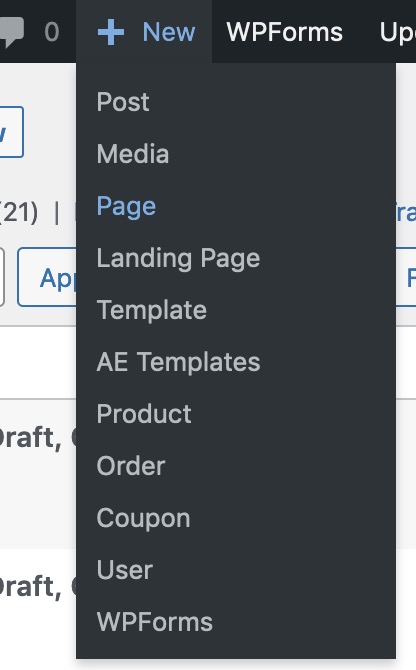
The next three menu items will be very useful to you: +New, Edit Page and Edit with Elementor.
+ New allows you to create any kind of new page or post for your site, or add media or a User.
Many of these belong to plugins that were added. The main WordPress items are: Post, Media, and Page. Product, Order, and Coupon belong to Woocommerce. WPForms belongs to WPForms (a nice – easy form editor.) Landing Page and Template belong to Elementor and you can choose a “starter layout” from a template (most are “Pro”, so, you probably won’t use these too much.) AE Templates are templates you create for use in various parts of your site – I’ll explain more later.
What’s the difference?
Currently, timsguitar.com has two kinds of content: Pages and Products. Pages are managed by WordPress proper, and Products is managed by Woocommerce.
Posts are “blog” entries typically. For example, if you decide to publish a “how to” page for do-it-yourself at home lessons, you would probably want to use Posts and assemble them into a blog.
You could select Media if you had a picture you take that you want to use later on a page – you can simply upload it to your Media Library and it will be available any time afterwards.
Edit Page and Edit with Elementor
Edit with Elementor only appears when you are logged in and on a page which has already been edited previously in Elementor. If Elementor has not been previously used on the page, then only Edit Page (or Post or Product) appears. This will take you to the setup page you arrived at when you originally started the page (post or product or…)
I have timsguitar.com to start with the Classic Editor. You can set this up to use the Block Editor (a.k.a., Gutenberg) if you want, but Classic is simpler and you only need to do a couple of things before you move to Elementor.
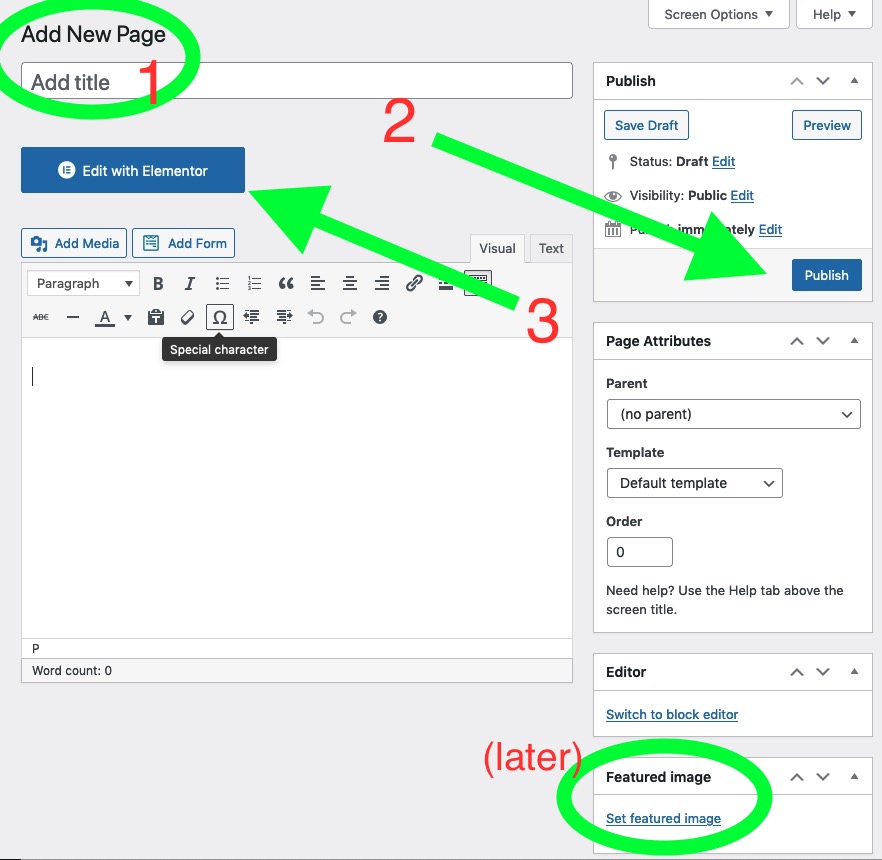
First: Create a Title. A title should reflect the main point of the page. You can add keyword phrases (very helpful) and “power phrases” (again: later.) For now – think about the link as the title becomes the link as in “About Us” becomes /about-us/ .
(In the image, there is a circle around “Featured Image” — this belongs to search engine optimization and “social content” connections… it is helpful if you link your pages in Twitter and Facebook… just be aware of it for now.)
Second: click the Publish button. This will save the minimal page.
Third: Click the Edit with Elementor button to move over to the Elementor editor.
Once you use Elementor on a page, the Edit with Elementor menu item will become available so that any time you are logged in and on an Elementor page, you can quickly and easily edit or add content to the page.
Note: you can go back and forth between the Edit Page editor and Edit with Elementor. You can Update your page from either page and you won’t break anything.
Using Elementor, Part 2
Nuts and Bolts
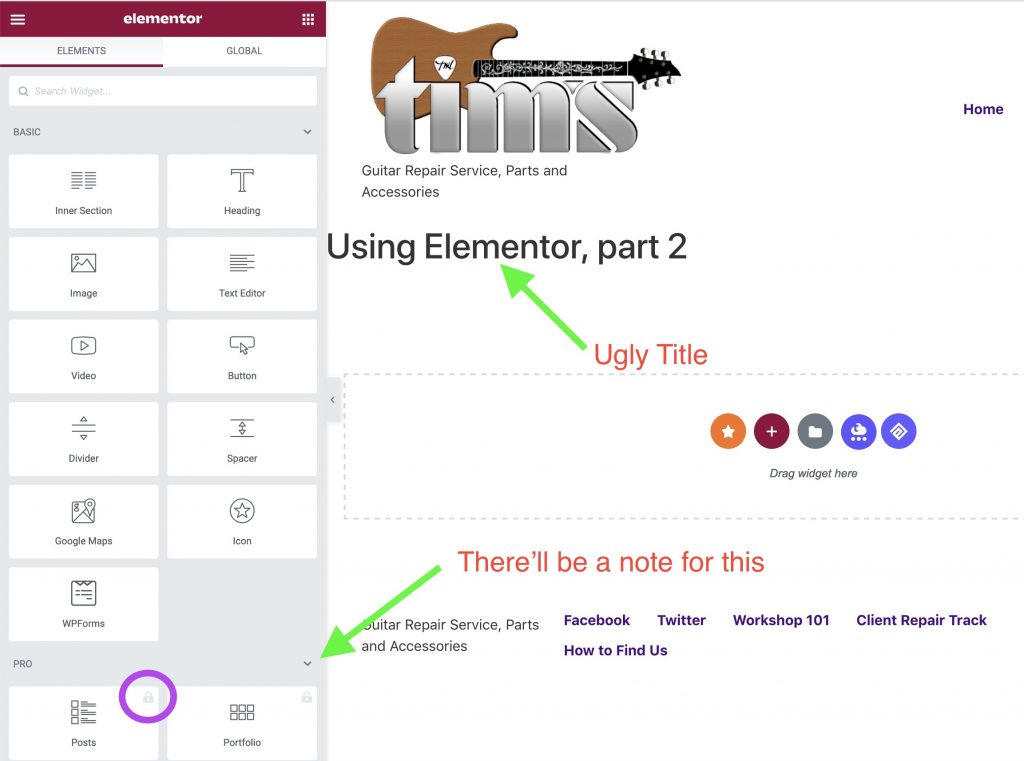
Once you get a new Page (post or product, etc.) set up, you will end up on a page like this:
(The left side of the page is the Elementor work space. It will change according to current function, starting with access to the basic installed “widgets”/”plugins”. The right side of the edit space will look like your page with the Header and Footer included — a “running preview” if you will.)
NOTE: Widgets are grouped by “maker” (like Essential Addons, etc.). There is a Pro version of Elementor and they group all their Pro widgets right under the basic widgets. There is a downward pointing “caret”. If you click on that, you can toggle the visibility of that group. That will help get them out of the way.
For some widgets, you will notice a “lock” icon. These will all indicate Pro widgets and you will not be able to use them – so ignore them. Some plugin groups are mixed.
The first thing you’ll want to do is get rid of the basic, theme-based page title — it’s really ugly and lines up with the left edge of the page.
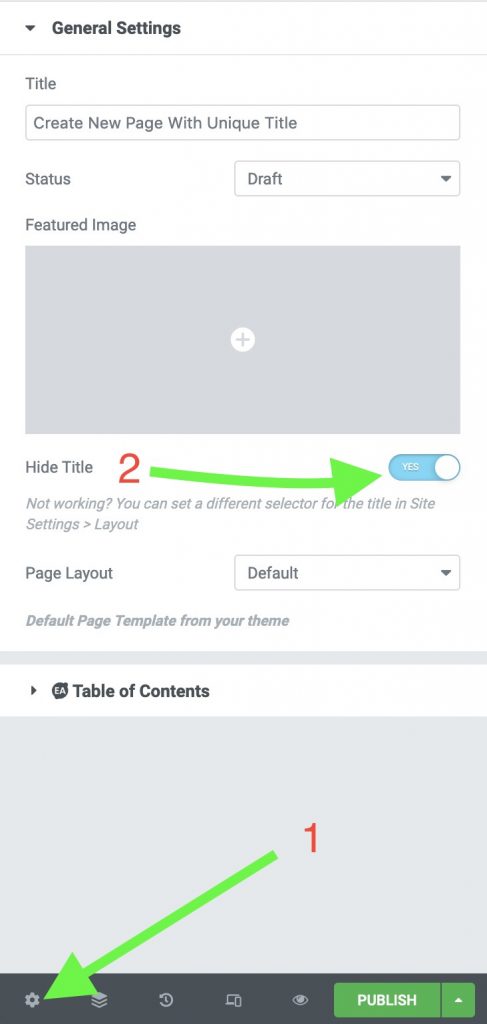
The Settings button (1) is at the very bottom left corner of the window. Click it then click the Hide Title slider (2).
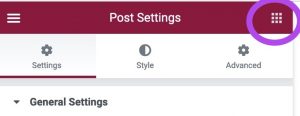
After you’ve hidden the Title, click the “Phone pad” icon to bring you back to the widgets panel.
Note: the menu on the other side of the Elementor column is called a “hamburger menu”… (see it?)
Drag a Title to the first Section and re-enter the page Title (and you can add anything else you like as well.
Using Widgets
There will always be an available “empty” section on any Elementor edit page. It looks like a rectangle with a dashed line outline with a number of icons in the middle. These icons represent various options.
You may have the center (core) three icons, the +, the folder and the blue icon with 3 dots (templately). Ignore Templately — it has to be installed and it isn’t and it’s not free.
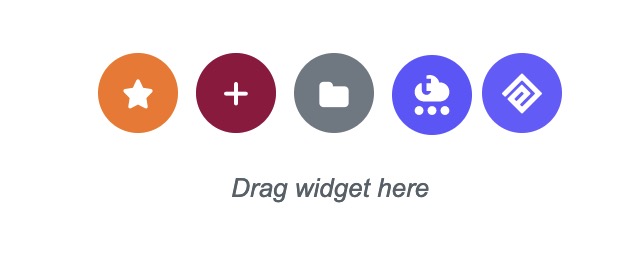
Clicking the Plus icon will open an option for different column layouts. The default is a single column and unless you need something else, there’s no point in using it.
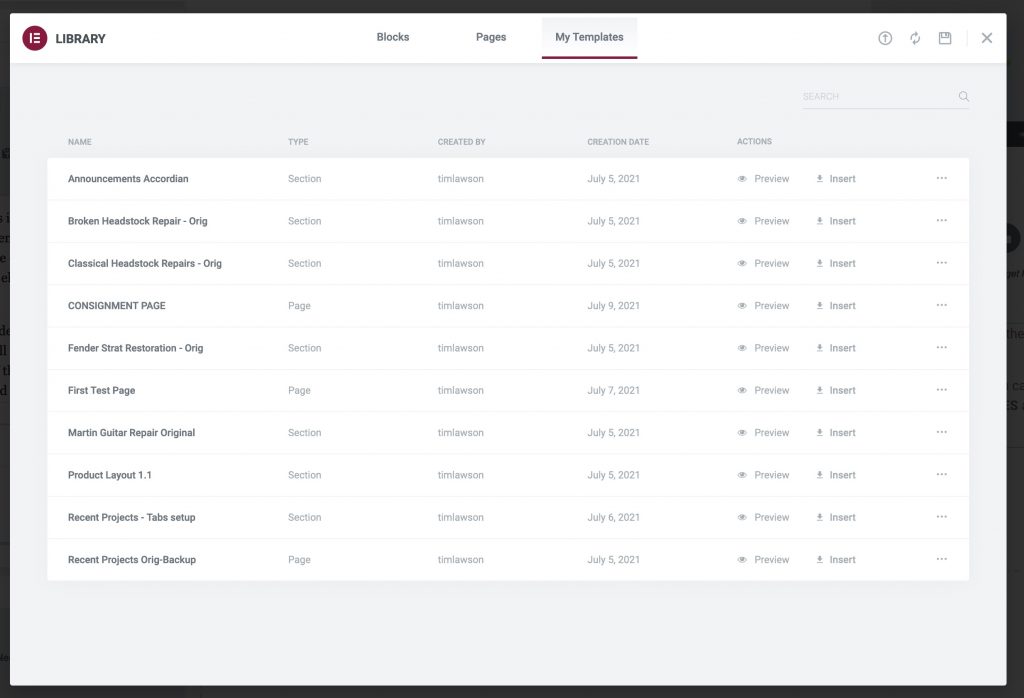
The middle (Folder) icon has it’s uses. Clicking on it will open up a Templates chooser. A lot of the pre-built templates are available, and you can look them over. They’re mixed Free and Pro (paid), but won’t be useful to you, in general. What IS useful is that YOU CAN SAVE YOUR OWN TEMPLATES and reuse them!!! This icon/button is how you will access them.
Note: this will be related to AE Templates as well as AE Templates can be used in a similar fashion.
When not using saved templates, then you’ll want to build a section of your page by dragging and dropping widgets into the section starter. If you don’t set up the columns first (and you don’t have to), the first widget you apply will create a Column.
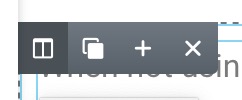
Columns have a control icon on the upper left corner of the column and the icon looks like an open book on a black square. If you mouse over the icon, it will expand:
The first icon (stacked squares) will Duplicate the column (including its contents).
The + icon will Add a new column and the X icon will Delete that column.
The Edit widget menu appears at the upper right corner of the widget space and appears as a “pencil” with an underline. The other icons mean the same thing as Edit Column: Duplicate and Delete.
These are both very useful shortcut tools to make customizing a layout quicker.
Resizing columns
As stated, you can add Columns using the Edit Column menu. Each new column you add will divide the section into equal parts. Not always what you want! You can click on the vertical black dashed line between columns and drag left or right to resize the column. You will see to percentage/size “tooltips” as you drag.You can also change the size in the edit widget column when the Column is selected (clicking on the open book icon).
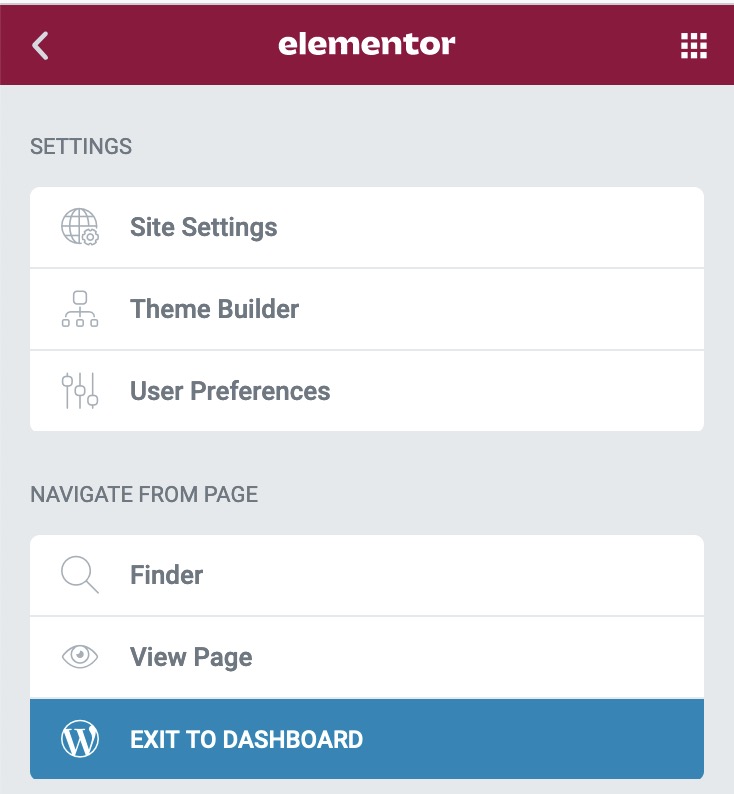
The Hamburger Menu
Site Settings is already set up and should probably be left alone until you know exactly what you’d be getting into. Changes to these items affect the entire site. However, if you really want to use larger font sizes, you can customize all the font stuff in this section so that you don’t have to keep styling it every time you create new content.
Theme Builder is an Elementor Pro feature only.
User Preferences are best left alone except for the option to Enable Lightbox In Editor (which is on). What this does is if you set an image to link to itself, it will be displayed in the center of the screen on a dark background. If this gets in your way, you can turn this option off.
Finder is a site-wide search tool. If you want to short cut to another page, you can use this instead of going back into wordpress Pages, Post or Products menus.
View Page will open the page you are editing as the regular visited page.
Exit To Dashboard is very helpful when you have to exit out of Elementor and get back to the “Edit Page” (or whatever) page… and there will be uses for this!
By the way, if you right click on Exit to Dashboard, you can Open in New Window or Tab and not leave the editor.
Using Elementor, part 3
Tips
You will find way more widgets available than you may ever have use for, but you get a lot of options with the different packages. Some of the widgets are similar to each other and you may find that there are those with the same name or close to it, but the ones from the different sources will have slightly different variations. For example, the “Modal Box” (specifically “Modal Popup”) I used for the front page is from the Exclusive Addons collection. It’s the only one that offers the Page Onload “trigger” function. All the others use buttons or images.
Once you get into an Elementor page, it helps to minimize the widget sections you can’t use or don’t need. Minimize the Pro section and the Woocommerce section (just to get them out of the way).
At the top of the Elementor column is a search tool. When you learn the names of the widgets you like to use, using search will make getting to them easier.
Most of the widgets you will use are in the Basics section anyway.
Use a lot of sections
It doesn’t make any sense to try to jam everything into one section. When you have to change layout, change fonts, change colors, whatever, just drag a new Text Editor widget into a new section. You can easily place images “inline” by adding a new column and dragging the image into the space and resizing the columns to match the text and image together. This is so much easier than anything you’ve ever used before.
A lot of sections don’t “cost” anything – they’re just formatting.
Use Copy/Paste … a lot
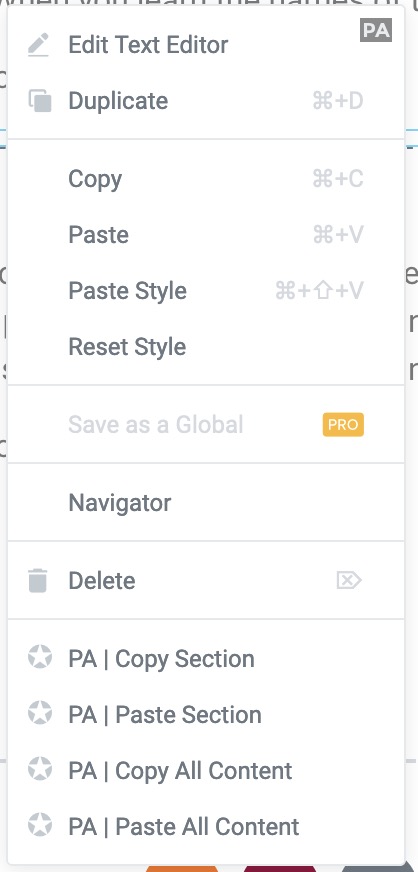
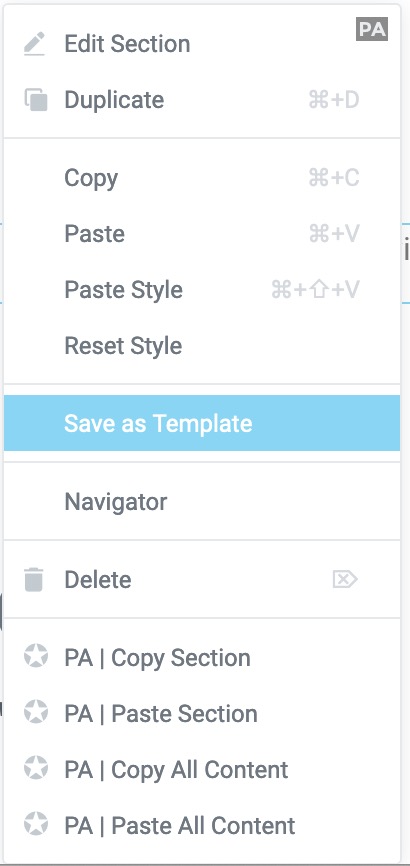
When you style any section, you can right click on it and you have all these options available from this menu:
It’s not so much about Paste as it is about Paste Style. Once you create one section, fully styled, you can match that style all across your page.
Note: all the menu entries at the bottom starting with PA means that those are addons from Premium Addons. (I think they’re kind of new and I’m not all that familiar with what they do…)
AE Templates
AE means Anywhere Elementor.
An AE Template is very much like any other page type you can use with Elementor. It’s very much the same, except they are not pages you can see anywhere – they’re not addressable when created (there are links you can use to access them, but wordpress doesn’t associate them with anything else).
So what’s the big deal?
WordPress is capable of using something referred to as shortcodes.
A shortcode allows you to plug in a saved template into any part of a page (this will be MOST useful when you need to create special entries on product pages.) It can also be used to create more complex entries in widgets. You can apply a shortcode to a Text Editor widget to display AE Template content like this:
When you see this in the editor, it looks like this:
[INSERT_ELEMENTOR id="###"]
And this is how it looks on a published page (minus the outline effects which I added to emphasize it — the underline is part of it).
We are an authorized dealer for Egnator Amplifiers, Reverend Guitars, Larrivée Guitars and Eastman Guitars.
We also sell parts like pickups, strings, etc. to be filled in later.
This particular AE Template is a common tagline, and all you have to do to reproduce it anywhere on your site is insert the shortcode. It’s quick and easy, AND, if you have to make a change, the change is automatically applied to every appearance on your site without having to do anything else!!
What else?
AE Templates give you the opportunity to build “blocks” that you otherwise wouldn’t be able to accomplish with the basic editing tools available.
We are an authorized dealer for Egnator Amplifiers, Reverend Guitars, Larrivée Guitars and Eastman Guitars.
We also sell parts like pickups, strings, etc. to be filled in later.
Combining material that would otherwise not be possible with the Toggle widget!
This is an AE Template of your What’s New page
New! Just Arrived!
Cort 515 cutaway electrics and 505 Easy play acoustic guitars. All setup and ready to find a new home!
Also in Larrivee L10 and LV10 Madagascar rosewood custom shop with LR Baggs Anthem SL pickup. Top of the line acoustics Mint condition with hardshell cases.
MINT AND NEAR MINT GUITARS AND BASSES IN STOCK
PRS CE basses, Takamine EG568C, Fender Aerodyne Jazz bass.
Come buy and check them out!
and discontinued items. Too many
items to list ! Many items 70% off
225-926-8467
Pretty much anywhere you can enter text, you can insert an AE Template!!
Save and use standard templates
Templates are a powerful tool in Elementor. You can Save a template, export it to your hard drive, and send it to somebody else to import on their site! (As long as they also have Elementor.)
There are different levels of template: there are Page templates which save everything you use in a page layout, and you can save individual Section Templates for reuse anywhere.
You can use templates to back up your work, so you can temporarily replace the content of a page (Christmas time) then restore the previous page by simply swapping off its template.
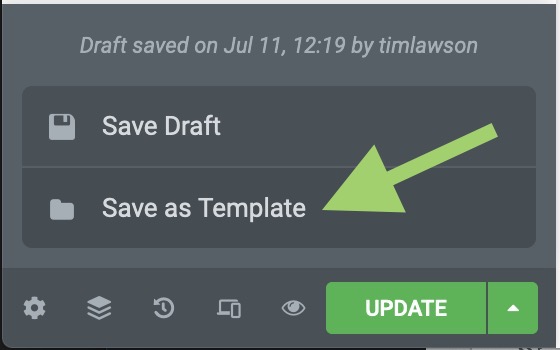
To save a page template:
To save a section template:
Final tip: watch a few YouTube videos on using Elementor
Try to avoid the tutorials with Indian speakers… they’re really hard to understand. I find them a waste of time most of the time… 😛
Google *rules* the internet
How you apply text to a page can hurt you!
Never use H1! Google has placed it out of favor. Apparently it is “too much” a call for attention and it has been abused by too many people. Google now penalizes for it.
If you want to emphasize text with a large font, *style* it! (In Elementor, go to the Style tab – find the section you want styled – find the “Typography” popup and use its controls. You can also color the text from there as well.)
Only use H2 once! This is the main topic of your page or subsequent sections. If the information on your page changes subjects, you may use H2 ONCE for each subject.
H3, H4, H5, H6. These can be used to label subsections of your content. They should not be used to emphasize text in subject content.
All pages should have “internal links”.
No page should “stand alone”. You should include at least one link to another page in your site. For example, all pages can generally be linked to a Contact form, or some other related page. Menus don’t generally constitute internal links.
All pages should have external links
Google likes it when sites play well with others. External links create a relationship with other sites that share the same kind of content. For example, your links to Seymour Duncan are excellent for pages containing information about pickups. Linking to Larrivee and Cort for guitars is another example. The better the link “quality” the better Google treats your pages. You could append links to your Facebook and Twitter sites on every page (I think you’re covered with the links in the footer).
Google thinks people are easily dazzled
Every page should have at least one picture because Google doesn’t think people will stop to read anything if there isn’t something to look at.
At that, Google wants all pictures to have a “Title” and “Alt” attributes. When you upload an image, you will see those tag entries on the upload page. Use them to your “Keyword” advantage: for example: Larrivee L10 at Timsguitar.com for the title and Larrivee L10 at timsguitar.com authorized dealer – on sale now (or something to that effect).
Google likes video. Video can be used as external links because you *should* have your videos hosted on YouTube or Vimeo and you can link to your YouTube channel. (Do not try to host videos on your hosting account – the bandwidth usage will not make netshapers happy and will slow down your site when people are watching.)
Google thinks people can’t follow too much information at one time
Paragraphs of information considered “too long” can hurt your page ranking. Paragraphs with complex sentences can hurt your page ranking. Google has been dumbing down the internet for years!! Try to keep subject information relatively simple.
Do not *stuff* keywords
Try to keep the number of times you repeat “keywords” to a “modest percentage” of the length of your page.
This really only concerns pages for which you *specify* keywords (I’ll get around to this — after you set up Rank Math which is an excellent Search Engine Optimization tool).
